Student-Led Conferences Means Empowering Student Voice

by Linda Adams and Colleen Behrens

“It’s not about us as teachers! The student is the center of the conference, so the student gets to be the one who facilitates the conference.”

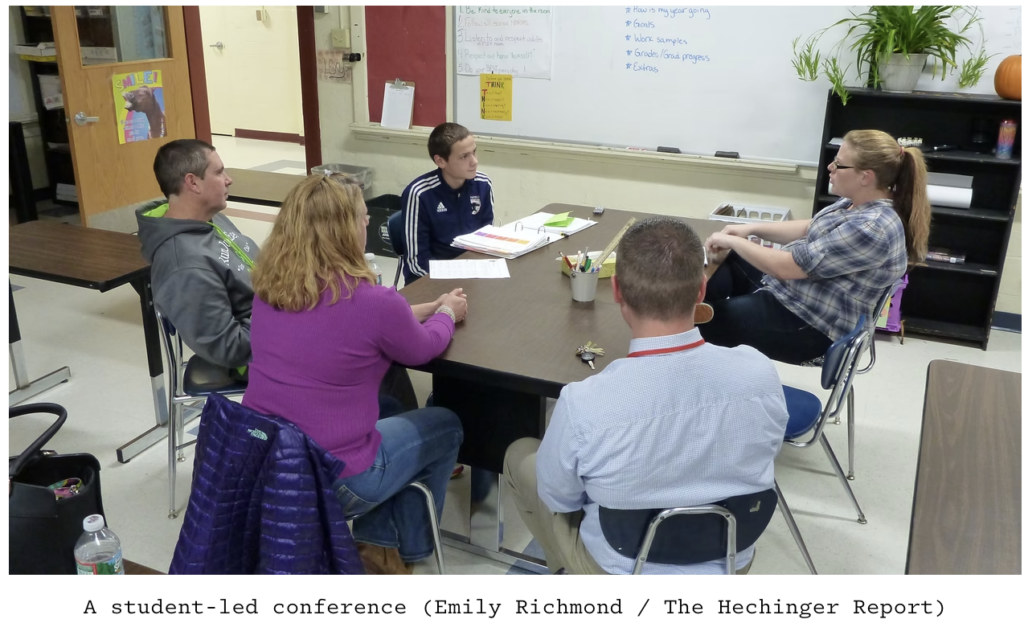
Once our schools went to student-led conferences we were hooked.  Parents no longer had to wait in line to talk to the teacher, students were more involved and the responsibility for the conversation shifted from the teacher to the student and parents. Students had conversations that were targeted on their learning, challenges and successes.  Students were very honest and reflective and we were observers that answered questions and provided feedback when needed. 

One thing to note, setting up student-led conferences does take some time up front, however, the reward is worth it, and once students are conferencing with their families you can relax a bit. We found it far less tiring to conference this way than the traditional ways of having the teacher lead the conference. Every student conferences, either at school or at home if they don’t come in. Watch this 5 minute video about Student-Led Conference.

Student-led conferences can be set up a few different ways.  One option is a conference with the teacher, the student and the parents with the student taking the lead as the teacher observes. Another option is setting up your classroom 4 to 6 conference areas.  Direct families to sit at an available table when they enter the room. Give parents/guardians the option to have you sit with them and answer any questions. Many times parents/guardians are satisfied with the student conference alone but others really want to “talk with the teacher”. As much as possible let the student share their learning, struggles and goals with their families, it’s a lovely process to watch, even for the students that have not done as well as they might have as families can now set goals or intervene as necessary.

Prepare Ahead of Time

  1. Determine student work: Create a list of student work that shows student learning overtime or consider letting students choose the work they are most proud of or the learned the most from. In Canvas, students can refer back to assessments that were submitted in previous quarters. If you choose assessments with the same skills then you can show growth.  For example, graphing analysis and interpretation from an assessment in October and a different assessment in January.  
  2. Reflect on learning and growth: Complete a student self-reflection ahead of time and keep the hard copy in case a student forgets their iPad conferences. Self-reflections on learning are meaningful and open the door discussions about strengths, challenges and goal setting.
  3. Provide a script: Create a simple script for students to follow if they choose.  Make sure they know where to find their self-reflection and Canvas assessments.  It might be helpful for students to make a digital presentation for parents/guardians ahead of time. This can also be viewed at home if families can’t attend a conference.
  4. Practice: Model how to do a conference and then pair up students so they can practice ahead of time. Provide directions at the table and encourage students to get started. Pre-teach this to students before conferences occur.

The following resources contain another video example, this one at the high school level, as well as a link to another awesome Edutopia blog article, a student google slide templet and a student reflection script. Be sure to check them out!

Resources

Jigsaw Revisited and Revised

Many of us have used the jigsaw method with students in our classroom, or during  professional development. If you are like me, you’ve wondered if the jigsaw method really works to increase student learning.  Here’s the good news.  John Hattie’s Visible Learning meta-analysis reveals that the Jigsaw Method has an astounding effect size of 1.20…if done right! Remember, the larger the effect size the stronger the impact on student learning. The average effect size of Hattie’s research is 0.40, or one year’s growth. This means that jigsaw can accelerate learning 3 times faster than average.

Jigsaw Refresher

In this 6 minute video, Jennifer Gonzalez from Cult of Pedagogy describes ways to organize your Jigsaw groups. Although the video does not include this last step discussed by Douglas Fisher and Nancy Frey in the article from ACSD.org  Show & Tell: A Video Column / Let’s Get Jigsaw Right, it give an excellent overview of how to set-up and troubleshoot a Jigsaw.

Adding the Final Step

Puzzle pieces on their own have no meaning.  Each piece can hint at a bigger picture but until the individual pieces fit together, we can only infer the meaning of the whole picture. The same is true of the Jigsaw Method. Students often miss the bigger picture without a step in the process that includes reflecting on how their piece contributes to understanding the whole text.

According to Douglas Fisher and Nancy Frey, one problem with using the Jigsaw strategy is the chance that a student might teach misinformation to the rest of the group. If the “expert” student has misunderstandings about their section of the text, then they inadvertently teach it wrong to the rest of their own group, thus compromising the full understanding of the text. Misconceptions can be difficult to remedy.

Some of the misunderstandings can be corrected if each group member meets with an” expert” group that reads the same section of text. With guiding questions, students are encouraged to work together to understand the text before returning to teach it to the rest of the group.  If the teacher visits the “expert “groups while they are working, then correction can be caught early. This second step results in a much deeper understanding of the section of the text the expert learned about. The problem is that the “expert” does not necessarily understand how the section of text they learned about fits with the whole text. Fisher and Frey advocate for a third step when expert groups come back together a second time to discuss the question:

How does our part fit with what we have learned about the rest of the topic?

“The real learning power of this strategy lies in the critical third step, when students reconsider their assigned passage in light of the whole text…Students think about their thinking (metacognition) and synthesize and analyze ideas contained within the complete text. This process requires that students listen carefully to their peers and analyze the ways in which each part contributes to the entire text.

Fisher and Frey

.

When students come back to their expert groups they must think about the connections, similarities and differences of their part to the newly learned content. As an example, each member of a home group receives a section of a data set about global temperature changes over time. Each member meets their expert group with the same data set for analysis and interpretation. When they return to their home group, each member shares their data set analysis with the group. The last step is for the group to determine the sequential order of all the data sets together through discussion with evidence and reasoning. Because of this last step, the student more deeply understands their own data set and whether their interpretation of a small set of data holds true when compared to the larger over-all picture.

Cooperative Learning Culture

The Jigsaw Method is a cooperative learning strategy created by Elliot Aronson in the early 1970’s as a way to break the racial tension in his classes after the desegregation of the schools in Texas. Aronson created a situation where the success of the group depended on the success of each student. Within a few weeks he saw a positive change in his class culture. The website Jigsaw Classroom.org has more about the history and success of cooperative learning as well as tips for implementation.

Suggestions for Success

  • Discuss expectations for behaviors and outcomes with each transition from group to expert to group.
  • Create a template or organizer for students to fill out while in the expert group. This ensures the same information is taken back to the group.
  • For emergent bilinguals, annotate academic and figurative language to make it more accessible.
  • Support discussions with guiding questions and sentence starters.
  • Assign specific jobs for each member during the small group work: Discussion leader, Timekeeper, Team Captain, Materials Manager
  • Add self-reflection time for students to monitor their contribution to the group and their understanding of the article content.
  • Tell students they will return to expert groups to think about what they have learned in relation to what they taught.

Resources

Fostering Executive Function Skills

picture source: Pathway 2 Success

This is a guest post by Tara Butler, Mathematics teacher at Cascade Middle School and finalist for the Oregon Presidential Award for Excellence in Mathematics and Science Teaching in 2021.

“Executive function is a set of mental skills that include working memory, flexible thinking, and self-control. We use these skills every day to learn, work, and manage daily life. Trouble with executive function can make it hard to focus, follow directions, and handle emotions, among other things.” 

Understood.org

In addition to teaching middle school students math, I see my life’s work as the opportunity to develop problem solving, critical thinking, communication, creativity, and collaboration through the vehicle of mathematics.  This charge also includes intentionally building Executive Function skills.  We want to prepare students not just for our subject area but for every facet of their lives.  

I’ve thought about the vitality to bring awareness to and to develop Executive Function skills in students, especially with the challenges the last year and a half has thrown their way.  I came across this article in Edutopia by Sarah Kesty, “Supporting Executive Function Skills by Asking Questions.”  I was inspired to deliver research based practices for my students to apply rather than my good faith efforts that weren’t giving each student what they deserve.

Following is a summary of what I uncovered:

  1.  Ask genuine questions rather than giving directives.  

We don’t want students guessing what they are to be doing but if directions have been given and/or the expectations have been made clear, we can ask a question to jog their memory about their next best step.  This relays high expectations and shows students we believe in their ability to solve problems and be self-sufficient.  

  1. Coach students to be their own coach.  

For example, in solving a challenging math problem they can ask themselves:

It can seem easy or time saving in the moment to answer a student’s question or tell them how to do something rather than the long game of teaching them to turn to themselves first as a resource. 

  • How is this structure similar to a simpler problem?
  • How can I draw this visually?
  • How can I look at this problem another way?
  • I will give myself time to think about this problem before asking for help.  
  1. Equip students with a set of general questions they can utilize in any situation*
  1. What do you notice?
  2. What parts do you understand?
  3. What do you think you might need right now?
  4. How can you tell?
  5. Where could you look for that information?
  6. How will you remember to use that strategy or take that action?

When we’re tired, overwhelmed, or stuck; what an honor for us to step back, put the content on the back burner for a moment, and remember that we play a critical role in shaping human lives.  

(More Lessons Learned from the Equitable Grading Think Tank) Grading is More than Grades #2: Retakes/Redos & Extra Credit

Equitable Grading: The Power of Points

Many teachers use some version of points in their grading system.  Points may be given for assignments and assessments, extra credit, behavior, participation, and/or motivation.  Most of us probably had teachers who used points in the classrooms we grew up in.  

The downside to using points is that they can turn into a commodity that students use to get a grade, rather than an accurate representation of a student’s knowledge.  Students may ask how to earn a few more points to get from an 87% to a 90%, but none would ask for those three points to move from an 84% to 87%. However, as long as the point increase is accompanied by an increase in learning, shouldn’t all increases be considered valuable?

Redos and Retakes

All of us have taught a lesson that did not go the way we’d hoped, only to get to try again the next period or the next day. What if our students stopped us and said, “Sorry, you can’t teach that to us again, you taught it yesterday!”

It is true that the world has timelines, but it also gives grace for learning. The ability to redo something happens all the time in our students’ lives.  (Retaking a driving test is perhaps the most important retake our students will have in their adolescence! When our children don’t do a good enough job cleaning their room we don’t say “You got one chance to clean it!” We say, “Go back and do it until it is done correctly.” They – and us – get redos every day, when the first effort wasn’t successful. 

If the goal of a class is to impart knowledge to a student, then when the student demonstrates that knowledge must be flexible.  The ability for students to try again to show their understanding of the content taught shows we value their learning, more than our timeline. Furthermore, if the students can represent full knowledge of course standards, they should earn 100% of the points available. Removing an artificial celling (i.e., student can only earn 80% of the original total may reward a student for persisting, but it also punishes them for not learning as fast as others. Why do we want to do that?

Retakes and redos as mandatory practices in classrooms provide an equal opportunity to all students to show what they have come to understand as a result of our instruction and purposeful tasks in the classroom.  If a student has a history of low success in school, providing multiple opportunities to be successful breaks a cycle of low achievement.  It tells the student the game is not won at halftime, but at the end – and that adjustments can be made along the way.  We also send the message to the students “I will not let you fail!” We continue to push the students to learn the critical information that we have determined is worthy of their time and effort.

8:33

Extra Credit Points

By definition, extra credit points are not required.  This means that is some extreme cases, the points may not even be related to the standards being taught in the course (extra points for bringing in supplies or cleaning the board.) Extra credit exacerbates school as a game.  If the purpose is for your students to know and understand a set of standards and content, then providing extra credit does not move a student toward more knowledge, it makes a grade currency that some students look to collect.  

Extra credit can also undermine the desired outcomes of student learning.  Students who play the point chasing game can give less effort to important key learning only to “make up” points with less critical knowledge.  If the extra credit points are tied tightly to the learning of the course, then shouldn’t they be available to all students, not just those who have the knowledge of how to navigate the educational system. If the work is important, require it; if it is not, don’t include it in the grade.  

Curious to learn more? Education Week Article: “No. You Can’t Do Extra Credit.” https://www.edweek.org/teaching-learning/opinion-no-you-cant-do-extra-credit/2014/12

WebEx Wednesday: A Model for Efficiency and Effectiveness

Isn’t it great to see kids back in class? Everything else aside, isn’t it great to see them?

With Wednesdays being WebEx-only days, we wanted to take this week’s blog to think through ideas for breakout rooms.

It can be nerve-wracking to release students to work independently without supervision. However, with structure and an efficient plan, WebEx breakout rooms can be a great way for students from across both cohorts to connect with each other and share their thinking or practice what has been taught in person.

Here are a few ideas about how to make the most out of your WebEx breakout rooms:

  • 1. Keep them short. Keep the break out rooms times between 2 and 3 minutes, no longer than 5 unless there is substantial work being completed.
    • It is better to use breakout rooms multiple times in a class session, rather than give them one breakout room for too long. NOT giving them enough time to have a complete conversation is best practice for virtual engagement. Too much time is unpleasant and awkward.
  • 2. Give the students one task to complete rather than several. Give them one question to discuss, rather than several. Provide Sentence stems. If students are unlikely to know how to begin, a sentence stem or two can provide a clear first step in how to start.
    • This link provides some prompts for students to engage in academic conversations:
  • 3. Provide a shared document. Create a Google document or a Jamboard (each group gets their own board) with a task or question that is to be completed during the time in the breakout room.
  • 4. Assign jobs. In order to help students, stay on task when working together in a break out room a specific role will guide their next steps.
    • a. Leader. Makes sure that everyone is participating, that people are unmuted and that cameras are on when possible.
    • b. Time keeper. Makes sure that the task will be completed before the breakout room is over
    • c. Scribe. Write the answers in the shared document. Alternatively, all students could be a scribe and write their answers in a different color.
    • d. Technician. Share screen in the breakout room so all can see what is being worked on.
    • e. Presenter. Share the group work at the end of the breakout room.Jobs can be assigned by alphabet, next birthday, tallest or other random affiliation.

After the breakout room is done, it is great information to ask students how the process went in their group. A scale of 1-5 in a personal chat will give you feedback on how the breakout rooms went when you were not able to be there.

In a nutshell, less is more. Less time, fewer tasks, little open-endedness. Keep them focused. Keep them efficient. Your students will be breakout room rockstars.

Increasing Student Access to Each Other and Our Curriculum: Three Digital Tools that Can Help

Ready or not, you are FINALLY going to meet your students in-person! And you can provide some of the engaging in-person learning that you did before! Or can you?

Social distance requirements will make small groups difficult, but here are three digital tools to easily enable small group work, be it in-person, in WebEx, or in Canvas.

THIS SIX-MINUTE VIDEO IS A BRIEF ‘HOW-TO’ FOR INCREASING DIGITAL STUDENT ACCESS TO YOUR COURSE CONTENT. Individual students, small groups, and whole classes will engage EASILY and VIBRANTLY, using these tools that are just as quick to learn as they are for students to use.

WHAT TO LEARN MORE? Here are some resources that might be useful:

JAMBOARD: 1. A flashy slide deck, meant to educate and ignite: https://docs.google.com/presentation/d/1taKkd0XM98UDJvd5H3Eb2VdB2zN629fc2omYXwtZuQg/preview?slide=id.ga0a586f102_0_501

2. Scroll down a bit for an Jamboard-orienting list of possible uses and activities: https://ditchthattextbook.com/jamboard/

3. If you like templates, here are a variety of games templates for a wide range of learning ages. Each link leads to a whole Jamboard deck of possibilities: https://docs.google.com/document/d/19YSKykpIamtW_Wj8RUgdyqzcRJ0Oic8cPeFnzPRR90s/edit

PADLET: For more information about any of the Padlet posting possibilities (audio, video, images, URL, drawing, articles), brief video tutorials abound on the internet!

1. Here is my favorite: this is an AMAZING collection, especially for us in the non-elementary set. You will find curated ideas for most every subject area group (including PE!) with an example of each board: https://medium.com/padlet-ink/55-padlet-examples-to-use-in-your-classroom-community-a306cc1da499

GOOGLE DOCS:

1. Here is a variety of information and suggestions – some will be familiar to you, but I will be surprised if you don’t find something you don’t know or have not thought of: https://pdst.ie/sites/default/files/36_Interesting_Ways_to_use_Google_Docs_in_the_classroom.pdf

2. For those of you that like tips, here are some options embedded in the standard Google Docs menu that you or your students may find helpful: https://www.weareteachers.com/awesome-and-surprising-ways-you-can-use-google-docs/

Guest Post: Graded Discussions Virtually – What Works?

MANY THANKS to Bend Senior High’s Jim Bright and his intern teacher Jordan Weinstein for sharing their protocol for graded, virtual classroom discussions. They’ve had great success with it, not only as a stand-alone activity, but have seen its positive impacts in overall, increased classroom engagement with all levels of learners.

To Begin: I start the class with a warm-up activity to activate students’ background knowledge.  I have found great success with the “Waterfall chat” format shown below.

After a stated amount of time, the instructor says, “SEND,” and students submit their responses all at once.  I have gotten high engagement using this strategy (23/27 participants in the lesson above), and I believe it is because it takes the pressure off of individual students to “put themselves out there” on the chat where everyone can read and scrutinize their answer.

After introducing two short primary source texts and some background information, I send students into breakout rooms for 10 minutes with a set of guiding questions to prepare for the graded discussion.  It is helpful to show students the slide below before sending them into breakout rooms, so that they understand what they will be asked to do and can maximize their time.

Once students return from breakout rooms, I hand off the reins to them.  I share my screen to display the slide above so students could refer to it as needed.  I take data by recording on a class roster each time a student spoke and the nature of their comment.  I divide my roster into four columns using the guidelines above: “Respectfully disagrees,” “Builds on a classmate’s comment,” “Connects to the text/supports with evidence,” and “Other.”  Students often fall into the “other” category when they make substantive comments that rely on background knowledge rather than the primary source texts we looked at in class.  Again, I make use of the chat function to give real-time feedback to students, which is a feature of virtual learning that is superior to in-person instruction.

The discussion lasts about 20 minutes.  I resist intruding on the conversation and find that when I am about to make a comment to guide the discussion forward, a student jumps in before me and takes the words out of my mouth.

(In hindsight, I would give students more time for the discussion, as we get feedback from some students that it is hard for them to get a word in edgewise.  Even so, we had 15/27 participants make at least one substantive contribution to the discussion.)

At the end of class, I share the data of who had spoken so students would know if they got credit or if they needed to submit a written response.  We also use the chat to have students rate the usefulness of the discussion on a scale of 1-10.  (Our lowest score was a 5 and we averaged between a 7-8.)

We have found since doing this lesson that our students are quicker in live classes to speak on the microphone or in chat, which was an unforeseen lasting benefit of this lesson.

SUPPLEMENTAL RESOURCES:

http://blog.online.colostate.edu/blog/online-teaching/5-discussion-ground-rules-for-the-online-classroom/ – BLOG POST – Originated at Colorado Statue University, here are some tips for facilitating asynchronous discussions. According to the post, asynchronous discussions fall into unhelpful or inappropriate routines quickly, as students generally have markedly different views of appropriate text comments. It is worth a teacher’s time to lay some netiquette ground rules and to monitor the first few closely.

https://www.facultyfocus.com/articles/online-education/how-to-make-your-virtual-discussions-engaging-effective-and-equitable-in-eight-steps/ – BLOG POST – Written for higher education faculty, this post provides a solid, thoughtful list of preparation items to attend to when preparing and executing virtual discussions effectively.